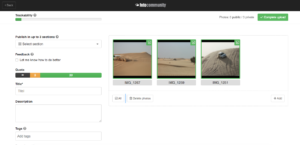
Pictures only become “public and open for discussion” if you have assigned them to at least one section in the photo settings when uploading them.
If no section is assigned the picture is only visible to you. Therefore, when uploading multiple images, it is necessary to assign at least one section to each image individually. Only then the images will be published when you confirm the upload button.
You can also assign sections and tags to all images at once. Make sure that they really fit to all images. You select all images by holding command (cmd) and clicking on each of them so that they all have a green tick in the upper right corner. When you have selected all images, you can assign sections and tags as usual, which will then apply to all selected images.

If multiple images are selected, you can select the section(s) for your images to the left of the images.
If you have only assigned the first picture to a section, only this one will be published and the remaining pictures will be assigned to your private photos. Initially these will be only visible to you. But of course you can publish them afterwards.
Publishing afterwards:
Click on “Edit photo” beneath the photo in large view. On the following page you can change all settings:
- check “Publish this photo” and
- Select sections for publication.
For details on how to publish photos later and how to set photos back to private after they have been public, please read the following help article:
http://hilfe.fotocommunity.de/de/hilfe/wie-kann-ich-private-bilder-nachtraeglich-veroeffentlichen/
A detailed explanation on how to upload a photo can be found here:
http://hilfe.fotocommunity.de/de/hilfe/wie-lade-ich-ein-foto-in-die-fotocommunity/